Tampilkan postingan dengan label Dry Hair. Tampilkan semua postingan

Jumat, 10 Mei 2013

Make a Gorgeous and Bouncy Waves Hairstyle

Make a Gorgeous and Bouncy Waves Hairstyle
Steps :
  • Step 1 & 2 : Take freshly washed and slightly damp hair and pin at top of your head. Take a small section and start roling the hair up to the root. then pin the hair useing Tin Foil.
  • Step 3 : Once you finish the bottom sectio, release a new section from the pinned hair and continue as before. Do this until all the hair rolled and Tin Foiled in place.
  • Step 4 : Use a flat iron to press each roll flat.
  • Step 5 : as your taking the tinfoil off if toy notice that you forget to press one of the rolls simple pin it back up and press before letting it out again.
  • Step 6 : spritz on a little hair spray and you're done!
You Should also see :

Selasa, 19 Maret 2013

Make a Side Swept Hairstyle

Make a Side Swept Hairstyle

Source : jointhemood
Tutorials You Should also see :

Sabtu, 02 Februari 2013

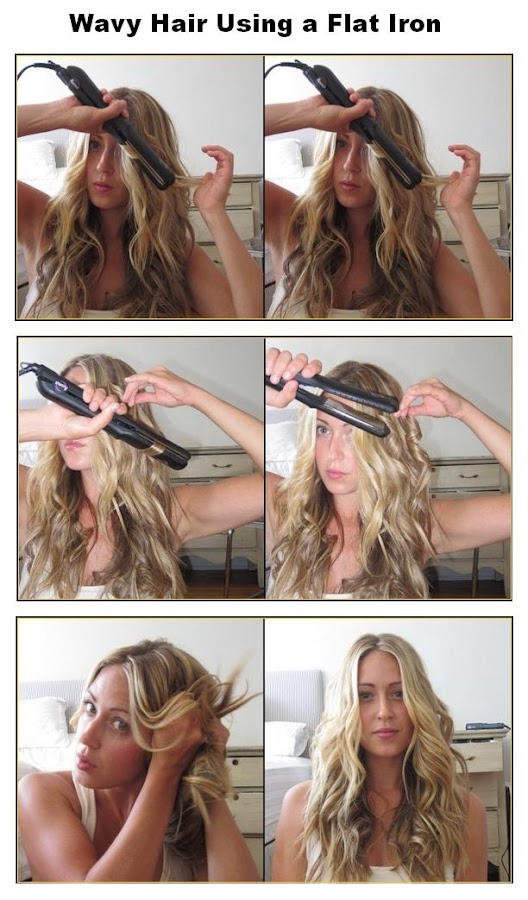
How To Make Wavy Hair Using a Flat Iron

This is a tutorial on how to make wavy hair using flat iron. This is very easy to do and it worked for me too.


Tutorials You Should also see :

Rabu, 16 Januari 2013

How To Get The Perfect Blowout at Home

How To Style :
  • Step 1 : Using a round brush, dry your hair and make sure it’s completely dry.
  • Step 2 : Twist your hand in a spiral motion when releasing hair from the round brush. You’ll end up with a pretty, spiral wave. Continue until your hair is completely dry.
  • Step 3 : Using either a 1-inch curling iron or wand, wrap 1-2 inch sections of your hair around the iron. Don’t do a spiral wrap; hold the iron so it is perpendicular to your head. This will create a relaxed waved that doesn’t start right at the root.
  • Step 4 : Lift a few sections at the crown of your head and tease for some volume. Do this in layers so you don’t end up with a “rat’s nest” effect. Don’t forget to smooth out the top!
  • Step 5 : Finish with a great hairspray. You can loosen your curls a bit more by running your fingers through it.

Minggu, 09 Desember 2012

The Faux Bob Hairstyle

How To Style :
  • Step 1 : This style works on a variety of textures, however, and can look great on straight, wavy, dirty or clean hair.
  • Step 2 - 3 and 4 : Impart your desired texture. To achieve a bouncier, looser feel, curl your hair with a 1 inch iron in fairly large sections.
  • Step 5 : Create desired base at scalp. A bit of backcombing sometimes makes the faux bob a bit more believable.
  • Step 6 : Gather the hair gently into the ponytail, you don’t need to really brush the hair back or smooth it at all, just secure it together.
  • Step 7 - 8 : Tuck and secure the ponytail. I rolled the ponytail underneath Sarah’s hair and pinned it to her scalp. The ponytail makes pinning that amount of hair much simpler. I used 3-4 bobby pins during this step.
  • Step 9 : Secure any loose bits.
  • Step 10 : Adjust the form. I used an old fashioned lift, which can be purchased at Sally Beauty Supply for under $1. In the photo, I’m lifting up the backcombing and creating our desired bob-like full shape.
  • Step 11 - 12 : Add some Hairspray and admire.

Kamis, 29 November 2012

How To Tease And Fluff Your Hair

How To :
  • Step 1 : At the end of your part, separate a 1 inch section of hair.
  • Step 2 : Starting half-way up the length of the hair (not just at the root!), tease downward repeatedly using a teasing brush. Don’t be afraid to over-tease, as you can lessen the volume when you smooth. Spray section.
  • Step 3 : Working backwards, separate and tease a second and third section of hair, and spray each section.
  • Step 4 : Use a boar bristle brush to smooth out the teased hair. You can also use the tail of your teasing brush to fluff and give shape. Spray again.
  • Step 5 : On left side of your part, separate a 1 inch section of hair, then tease and spray. Then tease and spray a second and third section working down the side of your head. Repeat on the right side of your part.
  • Step 6 : Smooth teased hair on the sides of your part, fluff and spray.

Kamis, 08 November 2012

HAIR - the side chignon

how to do the side chignon hair style Tutorial


Senin, 05 November 2012

Softly Pinned Half Updo Tutorial

Curls are pinned softly, with little definition, giving the hair a nice shape that still flows as if it were all down.
How To Style: 
Step 1 : Start by curling your hair with a 1 ½ inch curling iron, adding spray wax for more texture.
Step 2 : Use your fingers to softly scrunch up and pin sections of hair, pinning around your ear level.
Step 3 : Insert the bobby pins up into the hair, pushing the hair up slightly as you pin to add more body.

Tutorials You Should also see :

Sabtu, 03 November 2012

Taylor Swift Side Swept Hairstyle

How to Style :
Flowing curls is a cute prom hairdo that add charm to your personality. Just part your hair to side and let layers flip around your face for a gently feathered look. Side swept hairstyles are perfect for girls who like curls but not on top of head. For this look, just do a deep side part and pin hair to one side. If you don’t have curl naturally, for this look, just go for loose curl achieved with rollers and it’s done.
Tutorials You Should also see :

Selasa, 30 Oktober 2012

How to Blow Dry your Hair


Tutorials You Should also see :