Tampilkan postingan dengan label Ringlets. Tampilkan semua postingan

Rabu, 22 Juni 2011

1 Pigtail 1 Braid

To give a little history of this hair style you must understand that I would have never created a style that is one braid one pigtail.  This style is all designed by the 4 year old who has wore this style for about 2 weeks straight.  I finally decided I had better share this with everyone.  Some of you moms out there might just understand what its like to have a spunky daughter like mine.

I first made a small center poof.  I used the bobbie pin that you can see below to give her thin hair an actual poof look.  Then we split the poof hair and made 2 pigtails.
She always picked which side was the braid and which one was the ponytail.   
I finished off the ponytail by putting ringlets. 


Senin, 10 Januari 2011

Toddler Ringlets from Straightening Iron

This is my toddler's wild hair and I must say this is pretty mild compared to what it usually looks like when she wakes up.
So we went from the above picture to the one below in a matter of minutes with help from the straightening iron. 
 To give you an idea of her hair it is very thin and straggly.  The picture below is what we have to work with.
 

I start at the bottom of her hair and I work in layers, so I pull the rest of the hair in a clip out of the way.  Her hair has so many colic's in it that we change the curls directions depending on the way her hair naturally lays. 

I don't use the straightening iron the typical way of curling with it.  I slowly wrap the hair starting at the base of her head around and downward to the ends of her hair.  (if this is not clear please let me know)
I finish curling her whole head.

On this style I just pulled a small amount of bangs back out of her face. (she only lets me use 1 elastic)


Kamis, 18 November 2010

Toddler Ringlets

My Toddler is going through the I want only 1 elastic if I get 2 in its a miracle so we have been doing a lot of the same styles.  So here is a fun simple hairstyle for toddlers who want plain hair.
We made ringlets in her hair and pulled the bangs back with a Rockin Bobbie Pin

Kamis, 12 Agustus 2010

Angel Braid Bangs Back

My daughter is going through the "I want my hair down phase" 

This one is very similar to the other Angel Braid we did before except this one is keeping her bangs back and we added ringlets.

This braid is really easy once you understand how its done.  Start the braid as you would a french braid.  The only difference is you are only going to add hair from one side.  On her I made the 3 sections and then only picked up hair from the right side each time. 
Once the braid is in place I made ringlets with my straightening iron. 

Selasa, 10 Agustus 2010

Curls Twists and Fancy Fun

This style is so simple and yet so cute. 

First I made ringlets all over her hair.
Then I made very small twists with her hair and secured them with small bobbie pins.  If your daughters have thin hair then you can cross 2 bobbie pins to make the twists stay.
Next make some more small twists on the other side as shown below.
The fun part of this style is you can cross and mix the twists however you want.

Selasa, 25 Mei 2010

Sponge Curlers


My new work schedule has changed a lot lately so our hairstyles have gotten really simple.  I bathed my daughter the other night and she asked for curlers put in her hair.  I use sponge curlers since I think they are easier to sleep in.

To get big curls I made large parts and wrapped them tightly around the curlers.
When she woke up the next morning I took a blow dryer to make sure all the hair was dry.
Shown below I took one curler out to show the large curls these made.
Take out all of the curlers
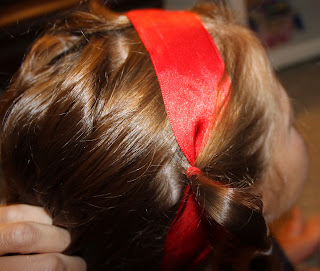
She asked for a ribbon headband.  Since we all know these don't stay in all day by themselves.  I took a small amount of hair just above each ear and singled it out.  Then place the ribbon behind that hair.  Pull the small amount of hair that was left out across the ribbon and take another small amount of hair on the opposite side of the ribbon and secure with an elastic. (SHOWN BELOW).
Take both sides of the hair and secure together at the base of her head.

Rabu, 05 Mei 2010

Felt Flower with Ringlets

We have a website that we just love that is for mom's of all walks of life.  The website http://www.mom-stuff.com/ just posted how to make your own felt flowers this is one of them.
The link to the flowers is http://www.mom-stuff.com/public/272.cfm
All I did for this cute simple style was used the ringlet curling iron shown below and made loose curls then we put the barrette in her hair. 

Rabu, 17 Maret 2010

Braids, Ringlets, and Ribbons

Everyday my daughter asks for full body pictures while I am trying to take hair pictures I told her I would post this full body picture for her.

Start by making your 3 french braids across the front of her head as shown in previous posts.
Then make ringlets in all of her hair.
Take a small ribbon and weave it in and out of her braids on both sides.  Tie the ribbons around the ponytail.

Below is the top view of her hair.
For the ringlets I used this curling iron below it saves me so much time and the ringlets stay in all day.

Selasa, 09 Februari 2010

More Valentine Rockin Bobbie Pin Fun


We have had so much fun with the Rockin Bobbie Pins.

I started by rolling her bangs back towards the side of her head and securing with a bobbie pin.


Next I pulled all of her hair into a high ponytail.


Then I made ringlets with my curling iron.


Then I used the bobbie pins to pull the ringlets up next to her head.

Below are several pictures taken of how I put the bobbie pins into her hair.


Ringlet Curling Iron

This is my ringlet curling iron. It is a conair and the ringlets last all day with this curling iron.

Senin, 08 Februari 2010

Valentine Fun with Rockin Bobbie Pins

A very fun and simple hairstyle.
I first made the Rockin Bobbie Pins.
I made these perfect with Valentine colors.
I then made ringlets all over her head. I have a special curling iron that has grooves in it the hair fits perfectly in to make the best ringlets that last all day.

Then I took her bangs and rolled them to the side and secured with one of the bobbie pins.

I took several small strands of hair and pulled them towards the back of her head and secured them with the fun new bobbie pins.
(Below) is the right side of her head.


Below is the left side of her head.


This is the back of her hair.