Tampilkan postingan dengan label Rockin Bobbie Pins. Tampilkan semua postingan

Kamis, 18 November 2010

Toddler Ringlets

My Toddler is going through the I want only 1 elastic if I get 2 in its a miracle so we have been doing a lot of the same styles.  So here is a fun simple hairstyle for toddlers who want plain hair.
We made ringlets in her hair and pulled the bangs back with a Rockin Bobbie Pin

Selasa, 14 September 2010

Toddler Twist w/ Rockin Bobbie Pins

I apologize for not many toddler styles anymore.  We cut my little girls hair into an A line and she will only let me use 1 elastic for her hair.   I will tell everyone that her hair looks much better cut and is filling out after taking off her baby hair.

Her bangs are still trouble so we did a twist or roll across the front of her head and wrapped it around to the left side of her head.  I secured it with an elastic.

We then put a flower made from http://www.mom-stuff.com/ they are called rockin bobbie pins.

Kamis, 15 Juli 2010

Rockin Bobbie Pins Fancy Uphair

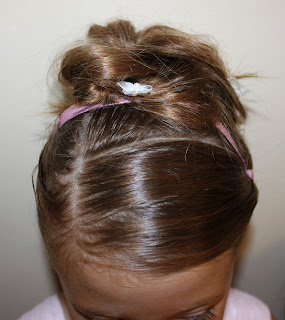
This is a fancy up style that we did for church.
Make a far lateral part and pull it towards her ear.  Secure with an elastic.  As shown below leave a small amount of hair out of the elastic along the face line.
On the opposite side make a part down to the ear and pull that hair forward out of the way as shown below.  Then put a ribbon along the part line.  Tie the ribbon together at the base if her head.
Make a part from ear to ear and pull it out of the way. 
Now take the hair you left out of the elastic and the hair in front of the ribbon and pull it to the center of her head and secure with an elastic.
Below is a side view of the hair over the ribbon.  I pull both sides back into this elastic to keep the ribbon in place.   If your daughter has fine hair then when pulling this hair back make a twist over the ribbon and if all else fells use a small bobby pin under the twist and over the ribbon.  This also helps keep the ribbon in place.
Make a messy bun with all the hair.
I made some fancy Rockin Bobbie Pins and pushed them into the messy bun.

Rabu, 30 Juni 2010

Rockin Bobbie Pins 4th of July

Follow the steps from the link below on how to get the hairstyle done.  The only difference is I pulled her ponytail into a messy bun because of our heat.  The summers are really hot here and she likes her hair up.

The Rockin Bobbie pins and how to make them came from http://www.mom-stuff.com/public/245.cfm.  I love these for accessories.
The picture below is showing how I put them in. 
The top view of her head.

Senin, 15 Maret 2010

St Patricks Day Rockin Bobbie Pins and French Braid Fun

Tons of fun with Braids and Rockin Bobbie Pins for St Patricks Day

Start by making a french braid down the center of her head as shown below.
Then make a french braid up her head toward the center braid.  Do this on both sides of her head as shown below.
You are going to continue making french braids around her head angled towards the center of her head.  Below is the part of her hair
Below shows the bottom back of her neck she is kneeling to get the bottom 3 french braids done.
Below is the french braid above and below her ear.
All in all you have 3 french braids acorss the front of her head and 3 at the bottom of her head.  Once these are done put them all in a ponytail.
Then make a messy bun or make ringlets to give a more sophisticated look.
If you want to turn this into a St. Patricks Day Hairstyle then make some fun Rockin Bobbie pins and I just slide them into different areas on her hair.

Selasa, 02 Maret 2010

Braid with Rockin Bobbie Pins

My daughter is going through I want quick hair so we decided to do a fun braid to keep her bangs out of her face and use one of our new Rockin Bobbie Pins taken from http://www.mom-stuff.com/.
I just did a simple frenchbraid across the front of her head and braided a little ways down.
Once the braid is done I curved it back and secured it with one of our cute rockin bobbie pins.

Selasa, 09 Februari 2010

More Valentine Rockin Bobbie Pin Fun


We have had so much fun with the Rockin Bobbie Pins.

I started by rolling her bangs back towards the side of her head and securing with a bobbie pin.


Next I pulled all of her hair into a high ponytail.


Then I made ringlets with my curling iron.


Then I used the bobbie pins to pull the ringlets up next to her head.

Below are several pictures taken of how I put the bobbie pins into her hair.


Senin, 08 Februari 2010

Valentine Fun with Rockin Bobbie Pins

A very fun and simple hairstyle.
I first made the Rockin Bobbie Pins.
I made these perfect with Valentine colors.
I then made ringlets all over her head. I have a special curling iron that has grooves in it the hair fits perfectly in to make the best ringlets that last all day.

Then I took her bangs and rolled them to the side and secured with one of the bobbie pins.

I took several small strands of hair and pulled them towards the back of her head and secured them with the fun new bobbie pins.
(Below) is the right side of her head.


Below is the left side of her head.


This is the back of her hair.

Selasa, 02 Februari 2010

Toddler Valentine Hair

As all of you with Toddler's know it is difficult to get pictures.


To start I made a far lateral part and made a small ponytail. Then I continued on across the front of her head towards her ear. There were 4 small ponytails (or puffybraids)

Once the ponytails are in place. I had made some Rockin Bobbie pins taken from my favorite Website for moms http://www.mom-stuff.com/ . These bobbie pins were so easy and fun to make that I recommend everyone trying them.
To finish up slide the Valentine bobbie pins through her ponytail.


For instructions on making your own Rockin Bobbie Pins click on the link I have included